How to Change a Vacuum Filter
Knowing how to change a vacuum filter is one of the more straightforward maintenance tasks a homeowner can do. A clogged or expired filter reduces suction, strains the motor, and circulates fine dust and allergens back into the air. Replacing or cleaning the filter on a regular schedule helps restore performance and extends the life of the machine.
The process varies depending on vacuum type and filter design. Bagless uprights, canister vacuums, stick models, and shop vacs each use different filter configurations — foam, felt, cartridge, HEPA, or a combination. Understanding which type your vacuum uses determines the steps involved and whether the filter can be cleaned or must be replaced.
This article covers how to locate, remove, clean, and replace the most common vacuum filter types. It includes tools, materials, step-by-step instructions, and adjustments for specific filter designs.
Tools and Materials
Tools
- Flathead screwdriver (for panel clips on some models)
- Soft-bristle brush or dry paintbrush
- Sink or utility tub with running water
Materials
- Replacement filter (matched to your vacuum’s make and model)
- Mild dish soap (for washable foam filters only)
- Clean dry towel
- Paper towels
Optional
- Compressed air canister
- Vacuum manufacturer’s manual (recommended for unfamiliar models)
How to Change a Vacuum Filter
Most vacuum filters are accessible without tools, though a few older or commercial models use panel clips or screws. Before beginning, identify your filter type using the owner’s manual or the model number on the vacuum. Filter types include HEPA cartridge, foam pre-filter, felt filter, and secondary post-motor filters. Some vacuums use two or more filters in combination.
Replacement filters are typically available from the manufacturer, appliance retailers, or online. Using a filter designed for your specific model is important — an ill-fitting filter can let fine particles bypass the system entirely.
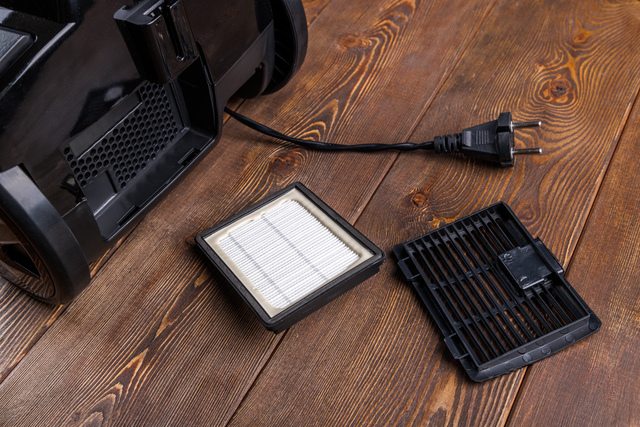
Cartridge and HEPA Filters
This applies to most bagless upright and canister vacuums. Cartridge filters are usually cylindrical or pleated and sit inside the dustbin cavity. HEPA filters are often a flat panel or rigid frame near the motor. Many models include both.
You will need:
- Replacement cartridge or HEPA filter
- Soft-bristle brush
- Compressed air (optional)
Steps:
- Unplug the vacuum before opening any panel or removing any component.
- Remove the dustbin by pressing the release tab and pulling it free from the body.
- Locate the filter inside the bin cavity — usually at the top or back of the chamber.
- Twist or pull the filter out according to the arrow markings or direction indicated in the manual.
- Take the old filter outside or over a trash can. Tap it gently against the rim to dislodge loose debris. Use a soft brush for pleated surfaces.
- If the filter is labeled washable, rinse it under cool running water until the water runs clear. Do not use soap on pleated HEPA media.
- Allow the filter to air-dry completely — typically 24 hours minimum — before reinstalling. A damp filter can damage the motor.
- Insert the replacement or cleaned filter, aligning tabs or arrows as indicated.
- Replace the dustbin and confirm it clicks into place before using the vacuum.
If water discolors heavily or the pleated folds are damaged or collapsed, replace the filter rather than reinstalling it.
Foam and Felt Pre-Filters
Foam and felt filters are common in bagless vacuums as a secondary layer of filtration, typically positioned around or beneath the main cartridge. These are often washable but degrade over time and need periodic replacement.
You will need:
- Replacement foam or felt filter set
- Mild dish soap
- Clean towel
Steps:
- Unplug the vacuum.
- Remove the dustbin and set it aside.
- Pull the foam filter free — it usually slides off a central post or fits in a ring around the bin cavity.
- Check the felt filter if present; it may be a disc or flat ring beneath the foam layer.
- Rinse foam filters under warm water. A small amount of dish soap can help remove embedded dirt. Rinse thoroughly.
- Felt filters can be rinsed if they are not saturated with fine dust. Do not scrub — it breaks down the material.
- Do not reinstall foam or felt filters while wet. Set them on a dry towel and allow 24 hours of drying time before use.
- If the foam is torn, compressed flat, or heavily discolored even after washing, replace it.
- Reassemble filters in the correct order — felt first, foam second, in most configurations — and replace the dustbin.
Shop Vac and Canister Filters
Shop vacuums use cartridge filters or foam sleeves, depending on the intended use. Dry-use filters differ from wet-use filters — using the wrong type for the job can result in filter failure or motor damage. Check the manual before switching tasks.
You will need:
- Correct replacement filter for intended use (dry, wet, or HEPA)
- Screwdriver (if the lid is fastened)
Steps:
- Unplug the unit and remove the canister lid.
- Lift out the filter assembly — typically a foam sleeve or pleated cartridge that fits over a central standpipe.
- For cartridge filters, tap out loose debris outdoors. Compressed air can help clear pleated sections.
- Do not use a wet filter for dry debris or a dry filter for liquid pickup. Cross-use can collapse the filter or pull liquid into the motor.
- Slide the replacement filter over the standpipe, aligning any notches or tabs.
- Replace the lid and check that it seals evenly before use.
Post-Motor and Exhaust Filters
Some vacuums include a secondary filter on the exhaust port, designed to catch any particles that pass through the main filtration. These are less commonly replaced but benefit from periodic inspection.
You will need:
- Replacement exhaust filter (check model compatibility)
Steps:
- Locate the exhaust port, usually on the back or side of the vacuum body.
- Slide or pop out the filter cover — most snap off without tools.
- Remove the filter and inspect it. If it is gray with embedded dust or visibly torn, replace it.
- Insert the new filter and replace the cover.
How Often to Replace Vacuum Filters
Replacement intervals depend more on usage conditions than on a fixed schedule. A vacuum used daily in a high-traffic home will need filter attention far sooner than one used weekly in a low-dust environment. Monitoring performance and inspecting filters regularly is more reliable than following calendar-based rules.
The following timeframes are general starting points, not firm deadlines:
- HEPA filters: Every 6–12 months under typical use. Inspect sooner if suction drops noticeably.
- Foam/felt pre-filters: Rinse monthly as a baseline. Replace when washing no longer restores color or structure.
- Cartridge filters (pleated): Every 3–6 months in average conditions. Homes with heavy foot traffic, renovation dust, or fine debris will shorten that window.
- Shop vac filters: After each heavy-use job, or when visibly clogged or damaged.
- Post-motor exhaust filters: Once a year is a reasonable starting point, though manufacturer guidance takes priority.
A practical indicator is performance. Reduced suction with an empty dustbin, visible filter discoloration, or a noticeable drop in air quality near the exhaust are common signs that filtration needs attention, regardless of when the filter was last changed. Running a vacuum with a compromised filter can increase motor strain and may shorten the unit’s overall lifespan.